Transitioning from Zoom to Microsoft Teams
On June 30, 2026, NAU began the process of retiring Zoom for university use. While NAU had been advised that Zoom Basic accounts would remain available for one year while the university completed its migration to Microsoft Teams, Zoom did not follow through on that guidance, and broad Zoom access is no longer available as a supported university tool.
All users should now complete their transition to Microsoft Teams for meetings, chat, and collaboration.
If Microsoft Teams does not currently support a specific workflow or technical need for your area, submit a ticket or contact Software@nau.edu to discuss your requirements.
Live Training Session Recordings
Explore recordings from previous live sessions covering Microsoft Teams meeting topics and features.
Microsoft Teams Meetings
Microsoft Teams meetings make it easy to connect and collaborate anytime, anywhere, and on any device. You can create meetings for members of your Team or schedule meetings directly through Outlook using Teams integration. Meeting participants do not need to be members of your Team to attend.
Teams meetings offer a variety of helpful features, including video conferencing, breakout rooms, meeting recordings, screen sharing, and more. The Meetings app allows you to quickly turn a team conversation into a video call or schedule a meeting for a later time.
Supported web browsers for Microsoft Teams online
Microsoft Teams for the web is supported on the most recent versions of major web browsers. For specific and up-to-date browser compatibility information, view Microsoft’s support documentation.
To ensure access to the full range of meeting features, meeting organizers are encouraged to use the Microsoft Teams desktop application.
Roles in a Teams Meeting
Teams meetings include different participant roles, such as presenters and attendees, each with specific capabilities. Organizers can assign roles based on the level of access and controls participants need during the meeting. For additional details, visit Microsoft Support: Roles in a Teams Meeting.
Types of Meetings
View Microsoft’s meeting, webinar, town hall comparison chart ›
Microsoft’s tips for creating large meetings ›
Microsoft Teams Meet Now lets you start an instant meeting with audio, video, and screen sharing so you can collaborate immediately without scheduling in advance.
Microsoft Teams channel meetings are meetings scheduled within a specific Team channel so conversations, files, recordings, and notes are automatically saved and shared with everyone in that channel. This allows team members to collaborate before, during, and after the meeting in one central location.
Best for collaboration, classes, and everyday meetings.
- Designed for interactive collaboration and discussion
- Open to internal and external attendees
- Two‑way audio, video, chat, and screen sharing for all participants (based on role)
- Features include breakout rooms, meeting recordings, live chat, reactions, and file sharing
- No registration required
- Ideal for team meetings, instruction, workshops, and small to medium group events
Best for structured, interactive events that require registration.
- Intended for planned events with a defined audience
- Require attendee registration (with customizable registration forms)
- Support interactive features such as Q&A, chat, polls, and reactions
- Presenters control participant engagement
- Attendance reports and post‑event analytics are available
- Suitable for training sessions, academic presentations, and informational events with limited interaction
Best for large‑scale, one‑to‑many broadcasts.
- Designed for large audiences and organizational announcements
- Structured as a one‑to‑many experience with limited attendee interaction
- Attendees typically consume content through live video and moderated Q&A
- No audio or video sharing from attendees
- Supports advanced production features (managed presenters, moderated Q&A)
- Ideal for campus‑wide announcements, leadership messages, and large public events
- Use a Teams Meeting if you want an interactive meeting where participants can collaborate, speak, share video, and work together in real time.
Best for classes, team meetings, workshops, and small group discussions. - Use a Teams Webinar if you need a structured event with registration, controlled interaction, and attendee tracking.
Best for trainings, academic presentations, and informational sessions with managed engagement. - Use a Teams Town Hall if you are broadcasting to a large audience and want a one‑to‑many experience with limited attendee interaction.
Best for campus‑wide announcements, leadership updates, and large public events.
Schedule a Meeting in Microsoft Teams
Stay in sync with your schedule by creating meetings directly in Microsoft Teams. There are several ways to schedule a Teams meeting, depending on where you start.
When you schedule a meeting in Teams, it automatically appears on your Outlook calendar, and meetings scheduled in Outlook appear in Teams as well.
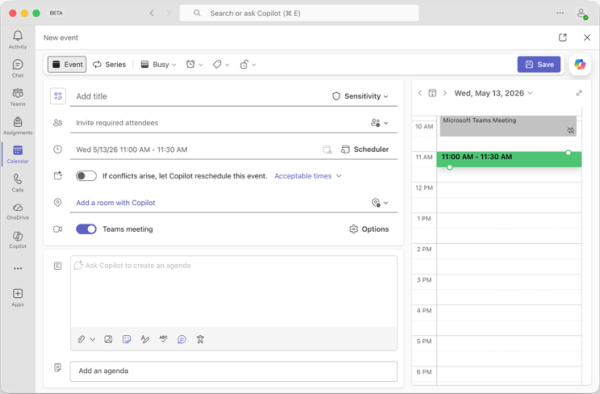
1. In Microsoft Teams, select Calendar from the left app bar.
2. Select a time slot on the calendar or select New meeting in the top-right corner.
3. Enter the meeting title, date and time, and add required or optional attendees.
4. Ensure the Teams meeting toggle is turned On so the meeting link appears in the invitation and Meeting options are available.
5. Select Save to send the meeting invitation.
1. In Microsoft Teams, select Chat from the left app bar.
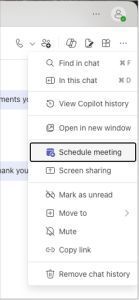
2. Open an existing chat, then select More chat options (three dots) at the top of the chat.
3. Select Schedule a meeting.
4. Enter the meeting details, including date, time, and participants.
5. Select Send to schedule the meeting and notify attendees.
1. In Microsoft Teams, select Teams from the left app bar.
2. Navigate to the team and channel where you want to schedule the meeting.
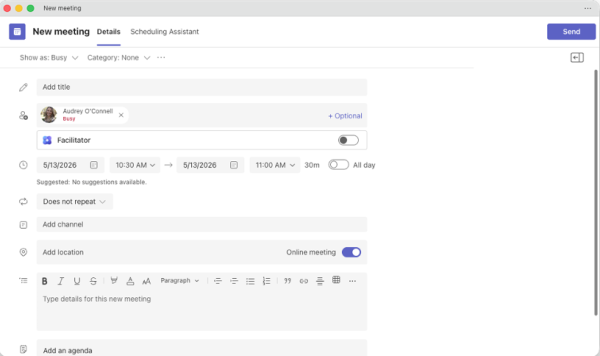
3. Next to Meet now, select the drop down arrow.
4. Select Schedule a meeting.
5. Add meeting details and include any attendees who are not members of the team.
6. Select Send to schedule the meeting.

Everyone in the team you scheduled the meeting for will receive a personal meeting invitation.
You can also invite a channel to a standard meeting by typing the channel name in the Add channel field. Once the meeting invitation is sent, channels can’t be added or changed. To update the channel, you’ll need to send a new meeting invitation.
Meeting Options
Meeting Options allow you to manage key settings for your Teams meeting, including:
- Lobby bypass and participant admission
- Assigning co-organizers (similar to Zoom co-hosts)
- Allowing microphones and cameras
- Enabling attendee reactions
- Automatic recording and transcription
- Attendance reporting
Windows – Outlook Desktop App
1. Create a meeting invitation in Outlook.
2. Select the Teams Meeting button in the Outlook ribbon to add the Teams meeting link.
3. Once enabled, a Meeting Options button will appear in the ribbon next to the Teams Meeting icon.
4. Select Meeting Options and make your desired selections.
Teams Calendar (Desktop or Web)
1. Create a meeting from the Teams Calendar.
2. Enable the Teams meeting toggle to add the meeting link to the invitation.
3. The Meeting options setting will appear directly to the right of the Teams meeting toggle.
4. Select Meeting options and configure your settings.
macOS and Outlook on the Web
1. Create the meeting and save or send it.
2. Reopen the saved or sent meeting.
3. Select the Meeting options link located below the Teams meeting link in the meeting details.
4. Adjust the meeting settings as needed.
Join Meetings
Meeting organizers include a join link in the meeting invitation, which can be accessed from Outlook or the Teams calendar.
Just before the meeting starts, a Join button will appear on the meeting invitation.
- Select Join from the meeting invitation.
- Then select Join online.
Meeting ID and Passcode
In addition to the meeting link, each meeting includes a Meeting ID and Passcode.
If you do not have the meeting link:
- Open the Teams Calendar
- Select Meet now
- Enter the Meeting ID and Passcode to join the meeting
Schedule a Webinar or Town Hall
| Features | Teams Webinar | VS | Teams Town Hall |
| Max #
participants |
1000 | 10,000 | |
| Use case | Single or panel presenters, attendees can chat, Q&A, reactions | Single presenter or panel. Attendees limited to Q&A | |
| Roles |
|
|
|
| Registration | Customizable registration form | No registration option | |
| Chat | Open to all – can be disabled | Chat is exclusive and Presenters.
Text to the attendees can sent using Announcements in Q&A |
|
| Pre-live set-up | Yes | Yes | |
| Recordings | Yes | Yes | |
| Accessibility |
|
|
Webinars
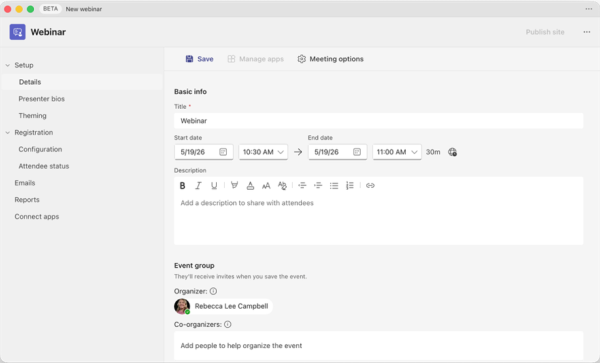
Webinars are scheduled directly from your Microsoft Teams calendar and are ideal for events that require registration and attendee interaction.
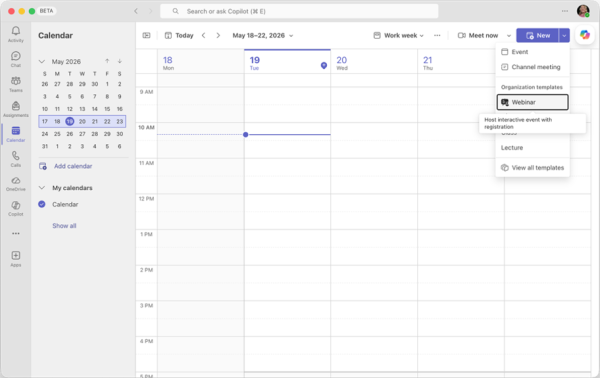
1. In Microsoft Teams, open Calendar.
2. Select the down arrow next to New meeting (plus icon) in the top-right corner and choose Webinar.
3. Complete the webinar setup details, including:
- Title
- Date and time
- Description
- Organizers and presenters
- Event access settings
- Attendee interaction permissions
4. Select Save.
5. Configure optional features as needed, such as:
- Presenter bios
- Event theming
- Registration questions
- Custom registration settings
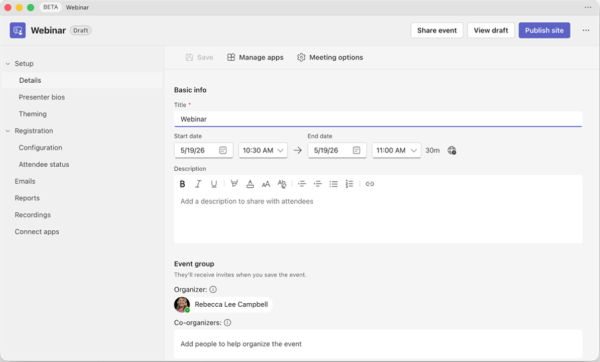
6. Select Publish to make the webinar live.
Share the Webinar
Use the Share button at the top of the interface to copy and distribute the registration link.
Notes
Theming:
The theming option allows you to apply branding to your webinar.
Registration approval:
If registration is set to manual approval, the organizer must approve each registrant.
If approval is not required, registrants will automatically receive a confirmation email containing the Join button.
Town Halls
Town halls are designed for large audiences and broadcast-style events without registration.
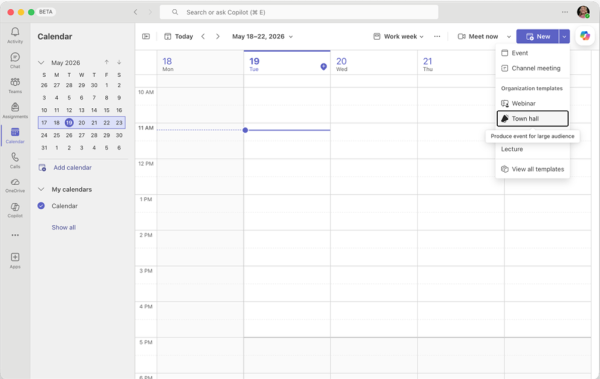
1. In Microsoft Teams, open Calendar.
2. Select the down arrow next to New meeting (plus icon) in the top-right corner and choose Town hall.
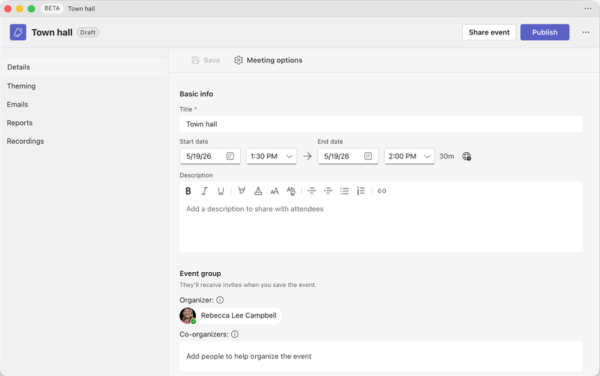
3. Enter the event details, including:
- Title
- Date and time
- Description
- Organizers and presenters
- Event access settings
- Attendee interaction permissions
- Invite attendees (optional)
3. Select Save and publish.
If attendees are listed in the Invite attendees field, they will automatically receive an email with the join link.
Share the Town Hall
You can invite additional attendees later or share the event link manually.
Use the Share button at the top of the interface to copy the join link.
In-Meeting Controls
During a Teams meeting, you can use various controls to adjust your view, engage with others, and access additional features.

Chat opens a panel for the meeting conversation chat where you can engage with others and share files. To hide the chat panel, select Chat again. To learn more, visit Chat in a Teams Meeting.
People lets you view a list of participants in the meeting, as well as those who were invited but haven’t joined. From this panel, you can also invite others or share the meeting details.
Raise Hand lets you signal that you’d like to speak without interrupting the current speaker. Select Raise to lift or lower your hand. Everyone in the meeting can see when your hand is raised, including the order if multiple participants have their hands up.
React lets you respond to moments during a meeting in real time. Select the React icon and choose an emoji to express your response. Your reaction will briefly appear in the meeting window for others to see.
View lets you change how you see other participants during the meeting. To learn more, see Using Video in Microsoft Teams.
Controls lets organizers manage meeting settings in real time, including participant permissions like screen sharing, chat, and mic or camera use. You can also lock the meeting, enable the lobby, and apply advanced protection settings for added privacy.
Rooms lets the organizer or presenter create and assign people to breakout rooms. To learn more, see Use Breakout Rooms and Join a Breakout Room.
Copilot provides AI-powered meeting features for users with a Copilot license. Use it to generate meeting summaries, create to-do lists, and more. Transcription must be enabled for these features to function. To learn more, see Welcome to Copilot in Microsoft Teams.
Apps allows organizers or presenters to add and use apps within the meeting. To learn more, see Use Apps in Teams Meetings.
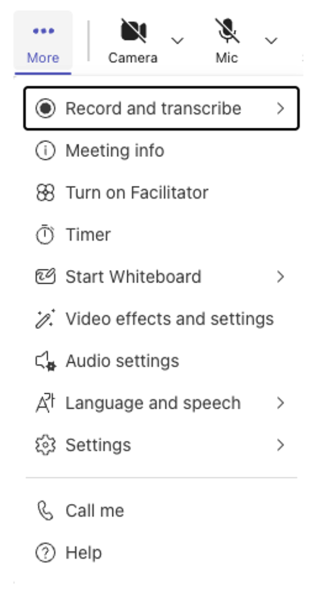
More opens a menu with additional features.
- You can record and transcribe
- Review meeting information
- Set a timer
- Adjust video effects and settings
- Adjust audio settings
- Turn on closed captions with Language and Speech
- Additional settings
Camera allows you to turn your video on or off, and use the dropdown menu to access additional camera settings and options. To learn more, see Using Video.
Mic lets you turn your microphone on or off, and access additional microphone settings through the dropdown menu.
Share gives you different options for sharing your screen or a specific window. Click Share to view different sharing options.
Leave lets you exit the meeting, with the dropdown offering the option to leave or end the meeting for everyone.
Spotlights in Meetings
Spotlight allows organizers and presenters to make a video the main view for all attendees, while Pin only affects their individual view.
To spotlight a participant’s video, select People from the meeting controls. In the participant list, find the person you want to spotlight, select the three dots next to their name, and choose Spotlight for everyone.
- You must be an organizer or presenter to use Spotlight.
- Spotlight makes a selected participant’s video the main view for all attendees.
- You can change or remove the spotlight at any time during the meeting.
- Multiple participants can be spotlighted at once (up to seven).
- You can spotlight yourself or other presenters.
Breakout Rooms
Breakout rooms allow organizers to split a meeting into smaller groups for focused discussion, with up to 50 rooms and options to assign, manage, and move participants during the session.
- Breakout rooms allow organizers to divide a meeting into smaller groups for discussions, collaboration, or brainstorming.
- Only the meeting organizer (or a designated breakout room manager) can create and manage breakout rooms.
- You can create up to 50 breakout rooms in a single meeting.
- Participants can be assigned to rooms automatically or manually.
- Rooms can be opened and closed by the organizer at any time during the meeting.
- The organizer can move participants between rooms as needed.
- Attendees can return to the main meeting when the rooms are closed or when prompted.
- Announcements can be sent to all breakout rooms at once.
- Breakout sessions are not recorded separately unless participants start a recording within their room.
You must be the meeting organizer or a presenter in the organizer’s organization with breakout rooms manager permissions to create breakout rooms.
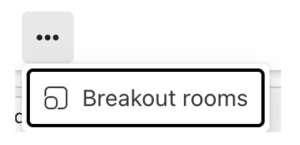
1. After a meeting has been created, and invites have been sent, open the meeting in your Teams calendar. Click the three dots at the top of the meeting and select Breakout Rooms.
2. Click Create Rooms and select the number of rooms you need and select Add Rooms.
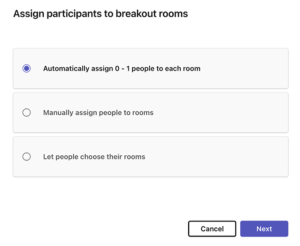
3. Click Assign Participants to assign participants to automatically assign participants to rooms, manually assign or let people choose their own rooms. Make your selection and click Next

4. Click the three dots in the upper right-hand corner of each room for additional options like renaming the room or deleting a room.

1. To create breakout rooms during a meeting, click Rooms from the meeting controls options.
2. Assign participants manually or click Shuffle to assign participants randomly.
3. Click Save.
4. To move everyone to their breakout rooms, click Open Rooms.

5. If you would like to send an announcement to all rooms, click the speaker icon.
6. Type in your announcement and click Send.
7. When you are ready to end the breakout rooms session, click Close Rooms.
To learn more, visit Manage Breakout Rooms in Microsoft Teams.
Polls
Microsoft Forms allows you to create surveys, polls, and quizzes. Polls are quick, one-question surveys that can be added to Teams channel posts or meetings, with up to 300 attendees able to participate during a meeting.
1. In the meeting controls, select Apps (or the + Add app icon).
2. Search for and select Forms (Polls).
3. Choose Add to open the Polls pane.
4. Select Create new poll.
5. Enter your question and answer choices.
6. Toggle settings such as multiple answers or keeping responses anonymous. (Optional)
7. Select Save.
8. When you’re ready, select Launch to share the poll with meeting participants.
• Responses will appear in real time in the Polls pane.
• Select Close poll to stop responses.
• Results can be shared automatically with participants or reviewed afterward.
Recording Meetings
Meeting recordings can be selected before or during the meeting. When meetings are being recorded, you will see a red recording icon in the upper left-hand corner of the meeting window.
1. When scheduling your meeting, select the Meeting options (gear icon).
2. Scroll to the Recording & Transcription section.
3. For Record and transcribe automatically, choose Yes from the dropdown to enable auto recording.
4. Use Who can record and transcribe to select who has permission to capture the meeting.
5. In Who has access to the recording or transcript, choose who can view the recording and transcript after the meeting.
1. When in a meeting, select More from the top meeting options.
2. Choose Record and transcribe and select Start recording.
3. To stop recording, select More again, and choose Stop recording, or end the meeting.
1. To find the recording for a meeting you created, open the meeting in your Microsoft Teams Calendar. You will see the meeting recap above the meeting description.
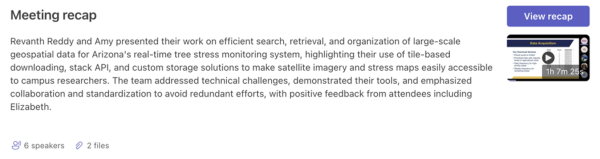
2. Select View recap or the recorded video image below to open the meeting recording.
3. The recorded meeting will open. You can watch your meeting in this window, or for more options, click Watch in Browser.

1. Navigate to your OneDrive at https://onedrive.live.com/login and log in with your NAU email address and password.
2. On the left-hand side select My Files.
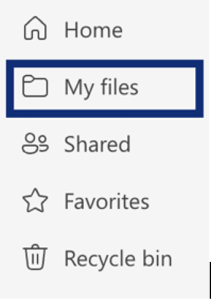
3. Select Recordings to view all your recorded meetings.
4. To view all meeting recordings that you have access to, on your OneDrive homepage select Meetings on the left-hand side.

1. After opening your recorded meeting and selecting Watch in Browser
2. Select Share in the upper right-hand corner.

3. A list of sharing options will populate. Select Share.
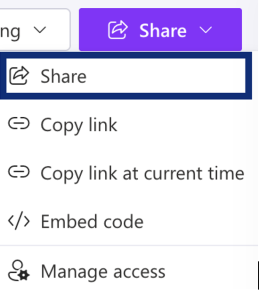
4. In the pop up, add people, groups, or enter an email address in the top field, and a message if you wish to include one.

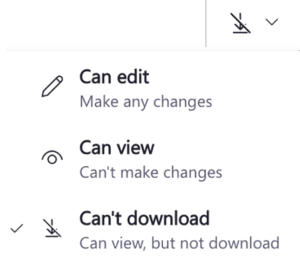
5. Select the dropdown in the top right corner to choose how people can interact with your recording. You can select “Can Edit” to allow people to edit the file, “Can View” to allow people to view the file, or select “Can’t Download” to allow people to view the file, but they cannot download it.
6. Select the gear icon for additional options. Once you make your selections select Apply.

7. Copy the link to share however you would like or select send if you entered names or email addresses.

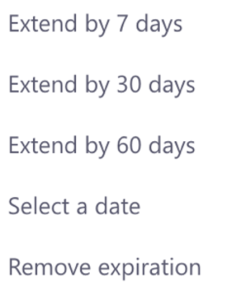
1. After opening the meeting recording from your Microsoft Teams calendar, underneath the meeting recording you will see the date the meeting was recorded and “Expires in X days”. Select Expires in X days.

2. Make your selection from the list of options.
Another place to save your meeting recordings and share them with others is through Mediaspace also known as Kaltura.
1. First, you will need to download your meeting recording. Navigate to your OneDrive at https://onedrive.live.com/login and log in with your NAU email address and password.
2. On the left-hand side select My Files.
3. Select Recordings to view all your recorded meetings.
4. Select the recording you would like to download.
5. From the option above the video, select Download.

6. Once your meeting recording is finished downloading, navigate to mediaspace.nau.edu.
7. Select Guest in the upper right-hand corner then select Login.

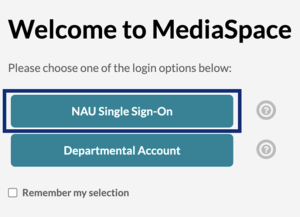
8. Select NAU Single Sign-On and login with your NAU credentials.
9. Select + Add New in the upper right-hand corner.
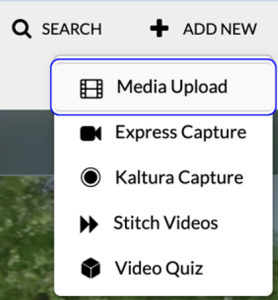
10. There are a few options you can choose from. To upload a meeting recording select Media Upload.
11. Drag and drop your mp4 file into the upload space or select Choose a file to upload to locate the file on your device.
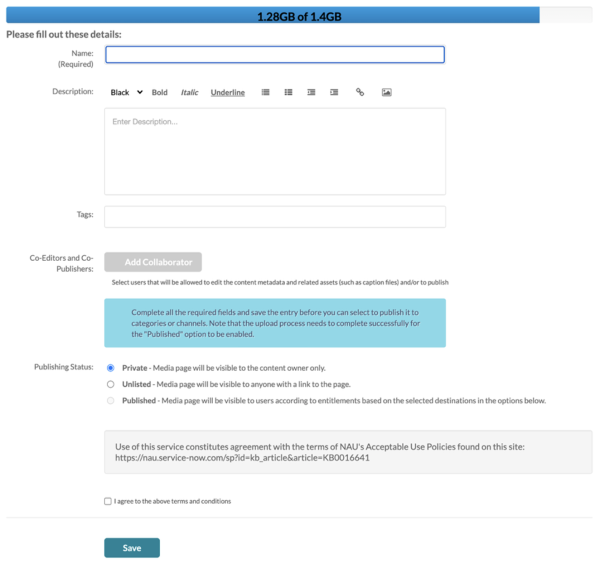
12. Your video will automatically start uploading. While it uploads you can enter the Name you would like shown for the video, a description, any tags, add collaborators, and change the publishing status. For sharing with a link, select Unlisted. Once the video is finished uploading, check the box next to I agree to the above terms and conditions. Then select Save.
NOTE: You can easily embed Kaltura/Mediaspace videos into your Canvas course, or you can change the permissions for your video once uploaded to Mediaspace to share directly with a link.
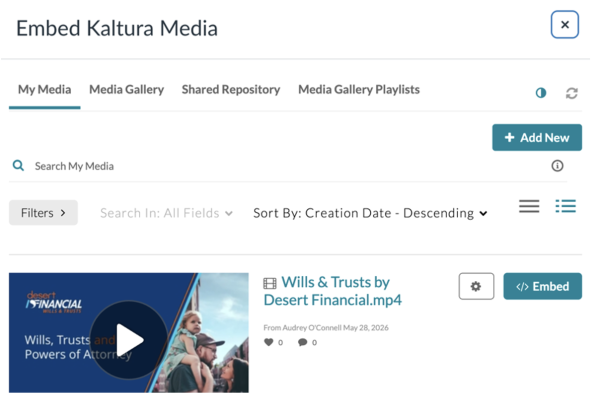
1. To embed media from Mediaspace/Kaltura directly into your Canvas course, on the page you are creating/editing, select the Kaltura icon (rainbow asterisk) from the top toolbar.

2. A popup will appear with all of your Kaltura media. Select Embed to embed the video into your Canvas page.
1. In your Canvas course, select Settings from the course options on the left-hand side.
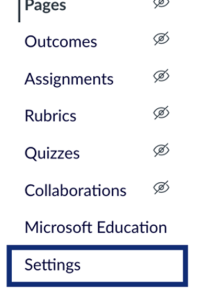
2. Select Navigation from the top toolbar.

3. Find Kaltura Gallery and make sure it is enabled. You can select the three dots to the right of it, then select Enable, or you can click and drag the Kaltura Gallery box to the top of the page with the other enabled navigation options.
4. Scroll down and select Save.
5. Once enabled and changes have been saved, select Kaltura Gallery from the course options on the left-hand side.
6. The first time you open Kaltura Gallery you will need to authorize the use of Kaltura in Canvas.
7. Select + Add Media to start adding your Kaltura media to your Canvas course Kaltura Gallery.

8. Check the box next to any media files you want to add.
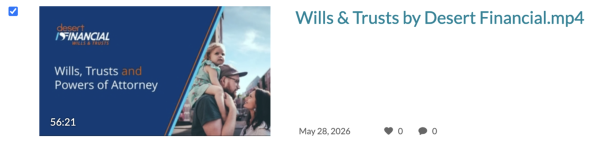
9. Select Publish.

Your media file(s) have now been added to your Kaltura Gallery.
Lobbies
A lobby in Microsoft Teams meetings is a virtual waiting area where participants may be held before joining the meeting, depending on the meeting’s access settings and the organizer’s preferences.

1. In Meeting options under Meeting access, use the Who can bypass the lobby dropdown to choose who enters the meeting directly. To require all attendees to wait in the lobby, select Only organizers and co-organizers.
2. Use the Who can admit from the lobby dropdown to choose whether only organizers and co-organizers, or presenters as well, can admit participants.
3. Select your preference for what attendees see while they are waiting in the lobby.
4. Use the Announce when people dialing in join or leave toggle to turn announcements on or off (this setting is off by default).
5. Click Apply to save your changes.
1. To turn the lobby off when in a meeting, click Controls in the meeting options at the top of the meeting.

2. From the drop down, select Enable Lobby to remove the checkmark next to it.
3. During the meeting, select Controls from the meeting toolbar at the top of the screen.
4. From the dropdown menu, select Enable lobby to remove the checkmark and turn the lobby off.
5. You can also choose View more options to open the full meeting options and adjust additional lobby settings.
6. Click Apply to save your changes.
Microsoft Bookings
Microsoft Bookings makes scheduling and managing appointments a breeze. Whether you need to book time to meet people or set aside time for different meetings, Bookings makes it easy and convenient for both you and your attendees. Bookings includes a web-based booking page, which is integrated with Outlook to optimize your calendar and gives others the flexibility to book a time that works best for them.
Personal Bookings is how you manage your own appointment timeslots, it allows you to easily configure and share your availability. You can be in charge of your own time and avoid the back and forth of scheduling. You can also set aside time for specific activities by creating meeting types. Once you publish your personal booking page, you can share the link with anyone who can then see your availability and easily schedule a time when you’re free and is convenient for them.
Shared Bookings allows you to invite your team members and create booking pages and let others book time with you and your team. It contains various settings to define services, manage staff members, configure schedules and availability, business hours and customize how appointments are scheduled.
Training resources for faculty
ⓘ After careful technical consideration, ITS has made the decision to temporarily pause access to the Microsoft Education LTI within Canvas. This decision was made as a result of ongoing technical challenges that our teams are currently working through in order to provide a more intuitive and seamless experience for our users.
At this time, our recommendation for instructors is to create a meeting in Microsoft Teams and share the meeting link with your attendees in your course navigation.