Contact ITS Support

OWA 2016: Distribution Groups
Working with and Managing Distribution Groups for OWA 2016
Exchange Email Distribution Groups (Lists) are used to send an email to a predefined group of users. OWA 2016 can be used by individuals to maintain and edit these groups.
Creating a Distribution List Accordion Closed
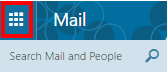
Step 1
Begin by selecting the “Menu Icon“.
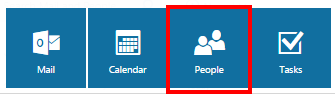
Step 2
Then, select the “People Icon“.
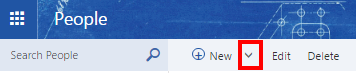
Step 3
Next, select the “Arrow” alongside New.
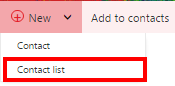
Step 4
This drop down menu should appear, select “Contact list“.
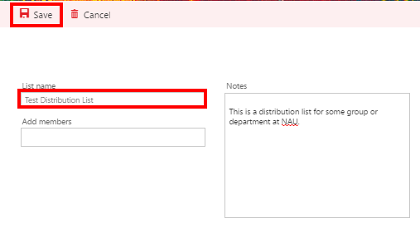
Step 5
Next, enter the name into the “List name” text field that you wish to title this contact list. For this example, we used the title “Test Distribution List“. Then, select “Save“.
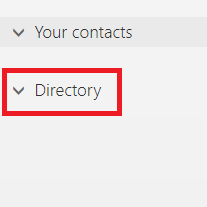
Step 6
Locate the Directory folder and select the “Arrow“.
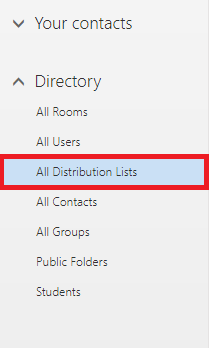
Step 7
Then, select the option for “All Distribution Lists“.
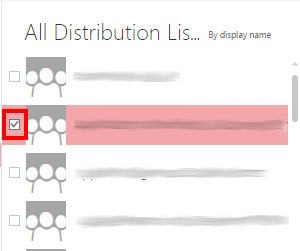
Step 8
Next, you will want to select the distribution list(s) you wish to add to the contact list previously created. To do so, you will select the distribution list(s) by filling the checkbox with a check mark as shown in the picture below.
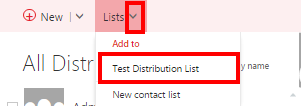
Step 9
Once you have selected your desired distribution list(s), select the “Arrow” alongside the Lists button. Lastly, select the contact list to add the already selected distribution list(s) to. For this example, we add the distribution list previously selected in Step 8 to the contact list “Test Distribution List“.
Distribution Groups – Adding Owners Accordion Closed
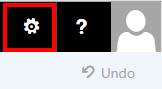
Step 1
After logging into the Outlook Web App, select the “Options Wheel” icon in the upper-right hand corner.
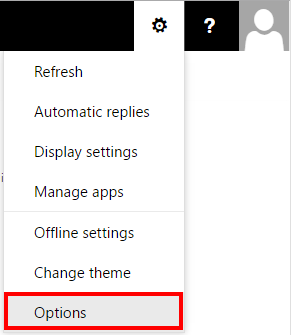
Step 2
From the drop down menu that appears, select “Options“.
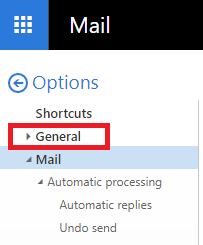
Step 3
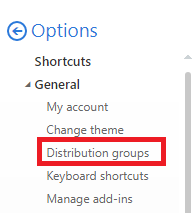
Select “General”.
Step 4
Select “Distribution groups”.
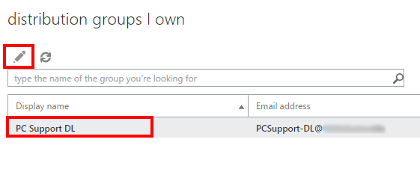
Step 5
Make sure you are under the “distribution groups I own” section. Select the distribution list or group you want to edit (in this example we use PC Support DL). Then, select the Edit icon (shaped like a pencil) to start making changes to list or group you selected.
Step 6
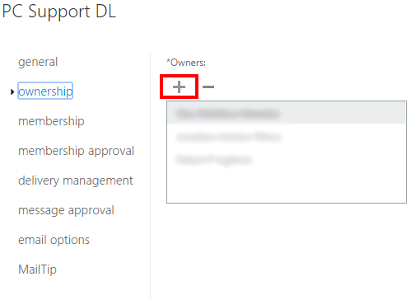
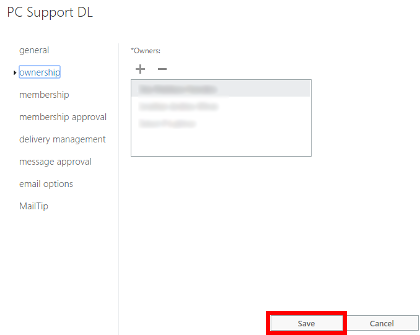
A new window will appear. Select “ownership”.

Step 7
Under the Owners section, select the “+” plus sign.
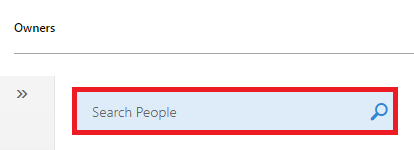
Step 8
Insert the name of the individual that you want to add as an owner into the “Search People” field.
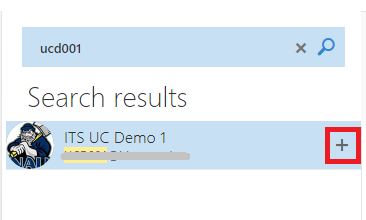
Step 9
Once you have inserted the name, select the magnifying glass.

Step 10
When the individual or individuals you are searching for appears, select the “+” plus sign to add them. Note: Repeat Steps 7-10 as needed to add more users.
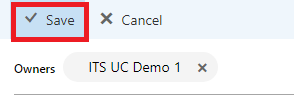
Step 11
Verify the individuals you added are present next to “Owners”. Once this is verified, select “Save”.
Step 12
Select “Save”.
Distribution Groups – Removing Owners Accordion Closed
Step 1
After logging into the Outlook Web App, select the “Options Wheel” icon in the upper-right hand corner.
Step 2
From the drop down menu that appears, select “Options“.
Step 3
Select “General”.
Step 4
Select “Distribution groups”.
Step 5
Make sure you are under the “distribution groups I own” section. Select the distribution list or group you want to edit (in this example we use PC Support DL). Then, select the Edit icon (shaped like a pencil) to start making changes to list or group you selected.
Step 6
A new window will appear. Select “ownership”.
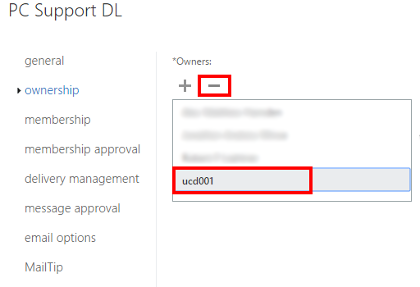
Step 7
Under the Owners section, select the individual you want to remove. Then, select the “-” minus sign.
Step 8
Select “Save”.
Distribution Groups – Adding Members Accordion Closed
Step 1
After logging into the Outlook Web App, select the “Options Wheel” icon in the upper-right hand corner.
Step 2
From the drop down menu that appears, select “Options“.
Step 3
Select “General”.
Step 4
Select “Distribution groups”.
Step 5
Make sure you are under the “distribution groups I own” section. Select the distribution list or group you want to edit (in this example we use PC Support DL). Then, select the Edit icon (shaped like a pencil) to start making changes to list or group you selected.
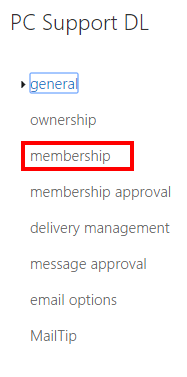
Step 6
A new window will appear. Select “membership”.
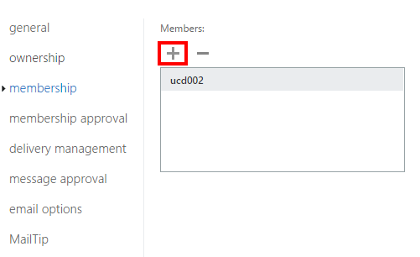
Step 7
Under the Members section, select the “+” plus sign.
Step 8
Insert the name of the individual you want to add as a member in the “Search People” field.
Step 9
Once you have inserted the name, select the magnifying glass.
Step 10
When the individual you are searching for appears, select the “+” plus sign to add them. Note: Repeat Steps 7-10 as needed to add more users.
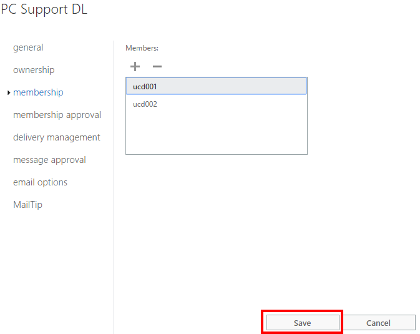
Step 11
Verify the individual or individuals you added are present next to “Members”. Once this is verified, select “Save”.
Step 12
Select “Save”.
Distribution Groups – Removing Members Accordion Closed
Step 1
After logging into the Outlook Web App, select the “Options Wheel” icon in the upper-right hand corner.
Step 2
From the drop down menu that appears, select “Options“.
Step 3
Select “General”.
Step 4
Select “Distribution groups”.
Step 5
Make sure you are under the “distribution groups I own” section. Select the distribution list or group you want to edit (in this example we use PC Support DL). Then, select the Edit icon (shaped like a pencil) to start making changes to list or group you selected.
Step 6
A new window will appear. Select “membership”.
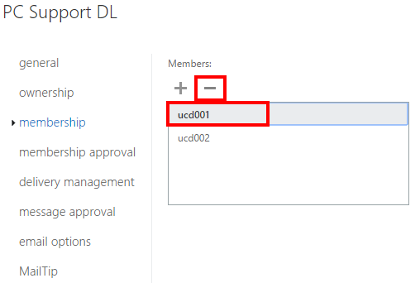
Step 7
Under the Members section, select the individual you want to remove. Then, select the “-” minus sign.
Step 8
Select “Save”.
