Return to...
Pubs Siteimprove training
Introduction to Siteimprove | Quality Assurance | Policies | Applying your knowledge
Introduction to Siteimprove
Logging in
- Check with Rye and ask if you have an account already.
- If you do NOT, sign in using this URL.
- Once you successfully sign in, check with Rye so he can configure your settings.
What is Siteimprove?
Siteimprove is a tool that scans all of the NAU websites for issues with accessibility, SEO, quality assurance, and Digital Certainty Index (please read this article that will provide brief definitions of these terms). It scans every site and will compile all of the items that have been flagged as issues into one place so that they can easily be found on pages and properly fixed. As a pub, you will be at the forefront of these changes, fixing things like broken links and misspellings on pages in order to improve the overall quality of the NAU web presence.
Choosing a site and group
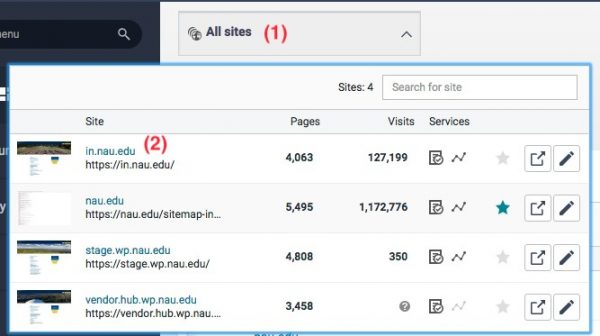
In order for the successive interactive tutorials to work, you will need to choose a site and group by (1) clicking on “All sites” and (2) choosing (for these training purposes) “in.nau.edu.”
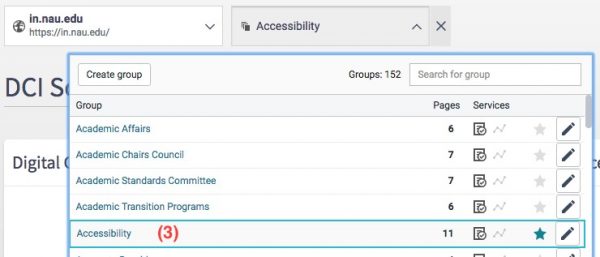
Then, (3) choose a specific group to work on (for these training purposes, choose Accessibility)
Interface
Follow along with this interactive introduction to the Siteimprove (SI) interface. Although we will be changing some of these settings in the next step, this will provide you with a general introduction to the interface of SI. Once done with this introduction, continue with the training below.
Navigating Siteimprove
Menu
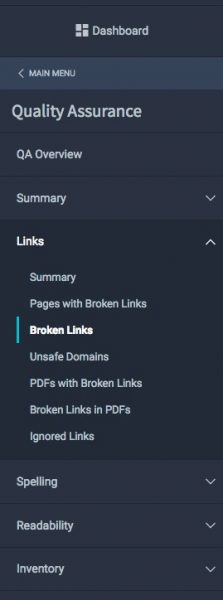
The Menu provides an in-depth and comprehensive way to navigate Siteimprove. Take a moment to familiarize yourself with the menu. Here are some common menu pathways that you might find useful:
- Quality Assurance -> Links -> Broken Links
- Quality Assurance -> Spelling -> Find Misspellings
Terminology
| Term in Siteimprove | How we normally refer to it |
|---|---|
| Site | Network (ex: in.nau.edu or nau.edu) |
| Group | Site (ex: nau.edu/library) |
Login routine
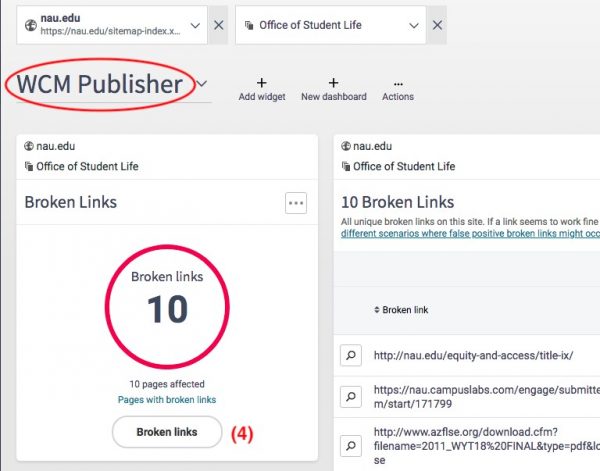
Every time you login to SI, follow these steps:
(1) Confirm that you understand the task assigned to you.
- For this example, let’s say that you were assigned to “begin fixing broken links on the Office of Student Life site.”
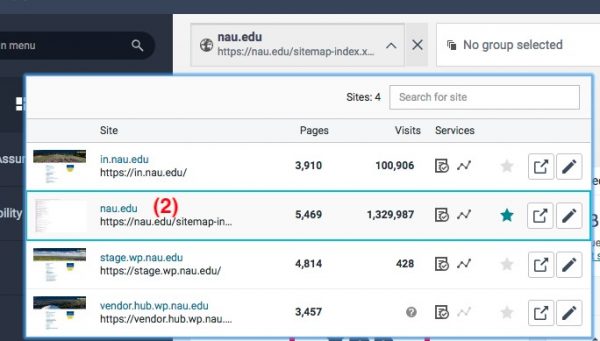
(2) Select the site.
- Ex: nau.edu
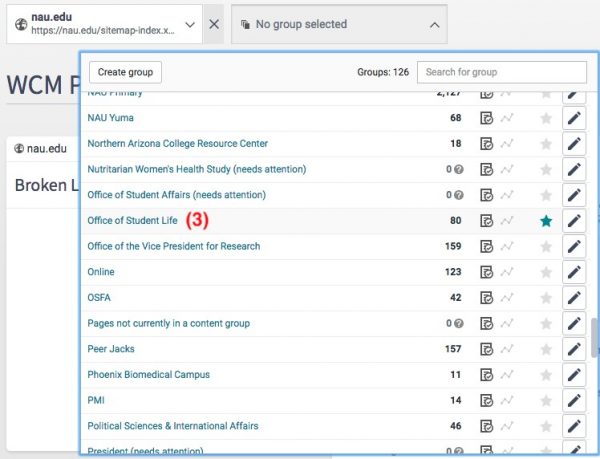
(3) Select the group.
- Ex: Office of Student Life
(4) Navigate to the widget you need. If you cannot find the correct widget to use, navigate to the section via the menu to the left of the dashboard.
- Ex: Click on the “Broken Links” button
Quality Assurance
Note: Please make sure that you have a site and group selected before continuing.
Definition
Quality Assurance is “a measure of the credibility and usability of the user-facing characteristics of your site” that takes into account four sub-categories: content quality (ex: misspellings), content freshness (ex: frequency of updates), user experience (ex: number of broken links), and security (ex: no sensitive information on the site, like social security numbers).
Broken links
Take this interactive tutorial to learn how to interact with broken links.
Misspellings
Take this interactive tutorial to learn how to interact with misspellings.
Locating an issue
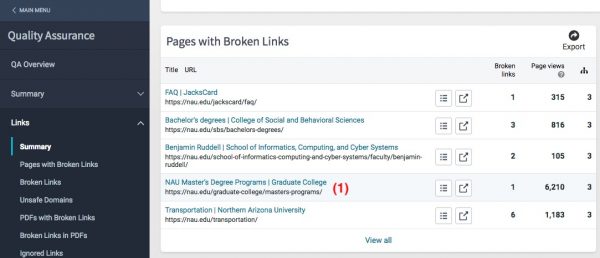
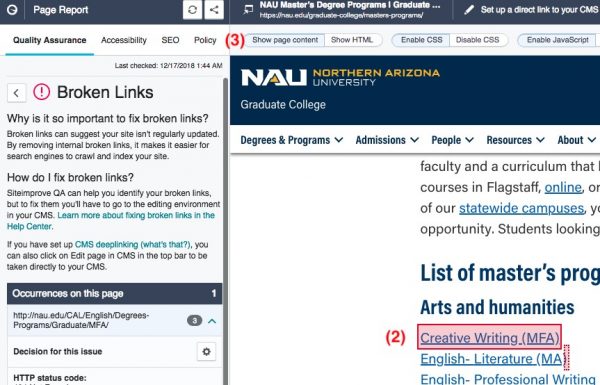
When (1) clicking on the URL, SI will (2) open a new window and highlight where the broken link is on the page. You can also (3) choose to show the view the page content or the HTML of the page to help you identify it:
Fixing the issue in WordPress
First, make sure that you are logged in to the WordPress site that you are working in. In order to actually make the change in WordPress, ensure that you are viewing the pages with either broken links or misspellings and use the ![]() button. This will open the page on the front-end and you will be able to edit the page at the top. NOTE: currently we do not have CMS deep-linking available, so the
button. This will open the page on the front-end and you will be able to edit the page at the top. NOTE: currently we do not have CMS deep-linking available, so the ![]() button will not work.
button will not work.
“Fix these issues to improve your score”
This widget, found on the WCM Publisher dashboard or by navigating to Quality Assurance > QA Overview on the menu, lists out specific issues that will improve the site’s Digital Certainty Index (DCI). The issues are listed in order of the impact they have the site’s score. Unless instructed to do so, you will not need to address the Accessibility or SEO categories in this list.
Policies
Note: Please make sure that you have a site and group selected before continuing.
Definition
Policy is a way to enforce NAU’s web standards and brand guidelines. Policies can be created by higher-level users and added to the Policy Library. A policy is basically a rule that find all of the instances on the desired site. For example, there is a policy currently in place to find all “embedded videos.” Policy will find all of the embedded videos on the site and/or group you select and will show you a list of pages with the element of embedded videos.
Policy overview
Take this interactive tutorial to learn how to navigate within the Policy section.
Navigating to policies
Find the policies currently in place on the WCM Publisher dashboard under the “All active policies” widget or by navigating on the menu to Policy > Policy Overview.
When to use policies
Wait for instruction before working with policies, as they will likely require additional context or specific fixes in order to be properly addressed.
Applying your knowledge
Now we will test the knowledge you learned by actually fixing issues on a site.
Note: Before beginning, select site “nau.edu” and group “Web.”
Open a new Google Sheets Document in this folder and title it “[Your name]’s – Applying your knowledge completion” and complete the following:
- Fix a broken link (include screenshots of what you fixed)
- Fix a misspelling (include screenshots of what you fixed)
- Think of a new policy that you think should be added to the Policies section
Note: you are not changing any content, just the broken links and misspellings themselves.
