How to create Sandbox sites
Sandbox sites are individual sites created within the training.wp network for clients taking the WordPress training. A client must complete all of the requirements in their Sandbox site, along with the other components of the training, in order to be considered fully-trained in WordPress and be eligible to obtain access to their department’s site on nau.edu or in.nau.
Before you begin
Before you begin learning how to create and manage Sandbox sites, ensure that:
- Your permissions have been configured properly by a Tier 2 or 3 member
- You’ve bookmarked the training network.
Steps to create a Sandbox site
Follow these steps to create a Sandbox site:
1. Open case in FogBugz Accordion Closed
You will be assigned a case in FogBugz from a client requesting a Sandbox site for themselves or for their student worker. Open this case and ensure that you have the client’s first and last name, userID, and email.
- If you are missing some of this information, then reach out to the client and request that it be sent.
2. Initial update of the WP Sandbox User Tracking Document Accordion Closed
Open the WP Sandbox User Tracking document. This document is used to track clients progressions through the training process, therefore it is imperative that the information is accurate and up-to-date. In the document:
- Create a new entry on the next empty line
- Input the user’s userID, first and last name, and email address
- Make the Date Registered today’s date, following the format YYYY/MM/DD
- Keep this document open in your browser tab
3. Create Sandbox Site in training.wp Accordion Closed
Follow these steps to create a Sandbox site:
- Login to the training network
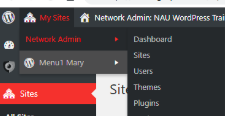
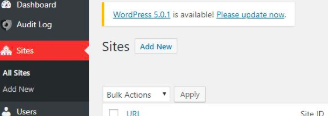
- Hover over “My Sites” > “Network Admin,” then click “Sites”
- Next to the title Sites, click “Add New”
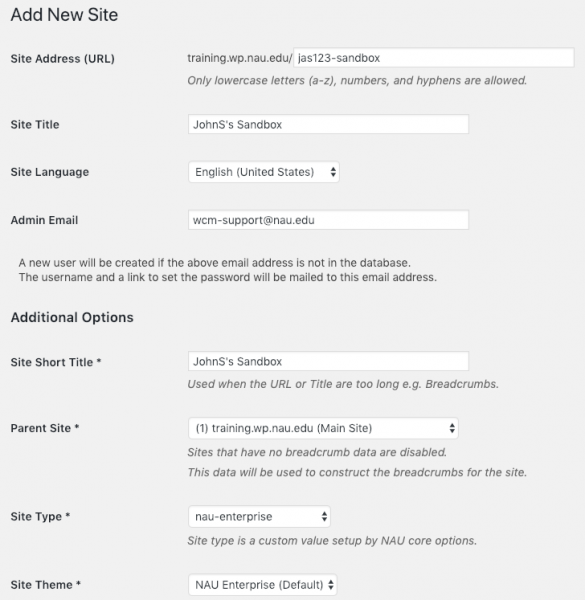
- Input information specific to your client
- Site Address (URL) will be “userID-sandbox”
- Site Title will be “FirstnameLastinitial’s Sandbox”
- Admin Email will be wcm-support@nau.edu
- Site Short Title will be identical to the Site Title field
- Site Type will be “nau-enterprise”
- Site Theme will be “NAU Enterprise (Default)”
- Leave Default Banner Image and Default Short Banner Image blank
- Do not change these fields:
- Site Language
- Parent Site
- Click “Add Site”
4. Create and set a homepage Accordion Closed
After adding the site, create and set a homepage
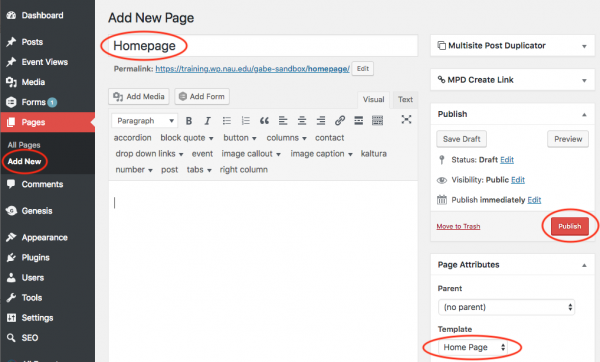
- Create a new page
- Navigate to Pages > Add New
- Title the page “Homepage”
- Set the template as “Home page”
- Publish the page
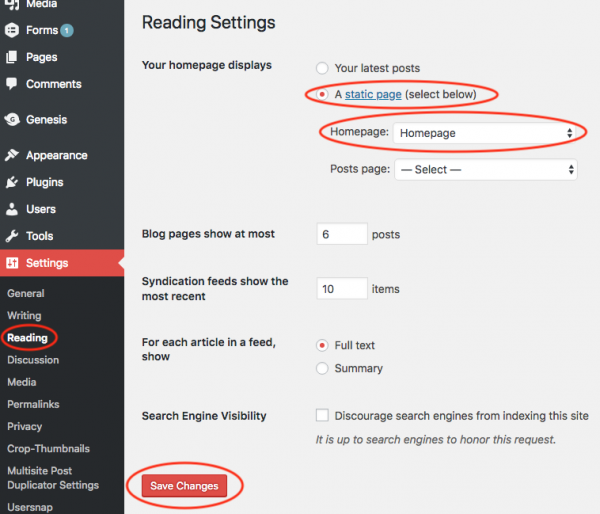
- Set the homepage as the static homepage in the settings
- Navigate to Settings > Reading
- In the “Your homepage displays” section, select the radio button that says “A static page”
- Set the “Homepage:” field as the page you just created titled “Homepage”
- Click “Save Changes”
6. Final update of the WP Sandbox User Tracking Document Accordion Closed
Return to the WP Sandbox Tracking document
- Visit the front-end of the user’s site, copy the URL, and paste it in the Site URL field in the document
7. Contact client in FogBugz Accordion Closed
Contact the client in FogBugz by sending an email to them.
- Save this email as a snippet in FogBugz
- Follow this general format for the email:
Good [Morning/Afternoon] [name of client],
Your NAU WordPress sandbox site has been created. Please go to the following URL and use the “Lost your password?” feature to reset your password and login: training.wp.nau.edu/wp-admin.
The next steps for the training requirements are as follows:
-Complete the NAU online training: http://nau.edu/its/learn/wordpress-editor.
-Build your sandbox site following the requirements: https://in.nau.edu/web/sandbox-requirements/.
–Contact WCM Support when your sandbox site is done and ready for approval.
-Attend an open lab: https://in.nau.edu/web/training-schedule/.
If you have any questions or concerns, don’t hesitate to reach out and we would be happy to assist.
Warm Regards,
[name of Pub]8. Resolve the case in FogBugz Accordion Closed
Resolve the case with a case note following this general format:
Created client’s Sandbox site, updated WP Sandbox User Tracking sheet, and informed client of the next steps in the process.
