Academic unit site support
Business unit site support
Forms
-
Overview Tab Open
-
How-To Tab Closed
-
Add a form to a page Tab Closed
-
Field index Tab Closed
-
Troubleshooting Tab Closed
Overview Accordion Open
New forms are added to your WordPress site using the Gravity Forms tool. Once a form is created, you can add it to any page within your site.
When creating a new form, especially for the first time, read through the instructions that automatically appear to get an idea of the overall process.
Forms can be used to generate an email, submit an online application, or upload files to a database. Forms can be simple or complex, depending on your needs. If you want some fields to be hidden until the submitter selects certain options look into the conditional logic settings in each field under their advanced settings tab.
Forms are not appropriate for collecting sensitive information or when a signature is required. If you need support building a complex form, please contact EASI Web Team.
How-To Accordion Closed
Create a new form
- Go to the Forms tab on the left-handed sidebar.
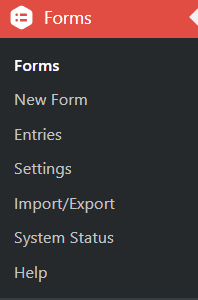
- Press the “Add New” button at the top of the screen

- Name your form and click “create form”
The Edit tab is where you add the fields to the form.

- In “Advanced Fields” use the Name and Email fields as they are required for all forms. Click the fields you want to add them to the form. Then you can drag them around to put them in the order you want.
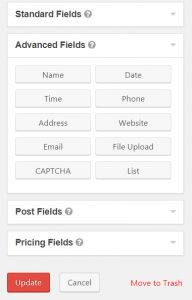
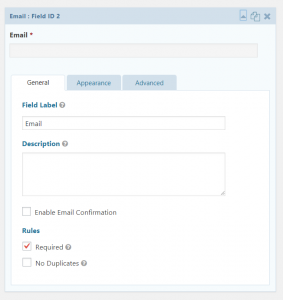
- When adding Fields click them to open their settings.
- The Field Label is what the submitter sees
- make sure to check the Required box if the field needs to be field out
- In the Appearance tab, you can set a Placeholder to provide an example
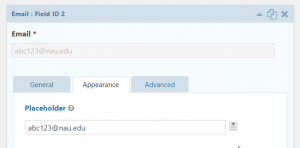
Before moving to another section within the Form, click Update. You will lose your work!
Form settings
The Settings tab is where you can configure the forms options.

In form settings:
- Label Placement must be Top Aligned
- Description Placement must be Above Inputs
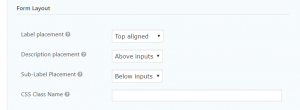
- Anti-spam honeypot must be Enabled
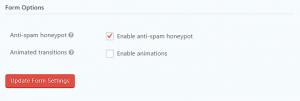
Before moving to another section within the Form, click Update Form Settings. You will lose your work!
Confirmation settings
Confirmations are sent to the submitter’s email and the message they receive can be edited here.

Select the confirmation to edit the message.

Before moving to another section within the Form, click Save Confirmation. You will lose your work!
Notification settings
This is where you set up how your department receives the submitted form.
The Admin Notification is required for all forms. Select the Admin Notification from the list to set it up.
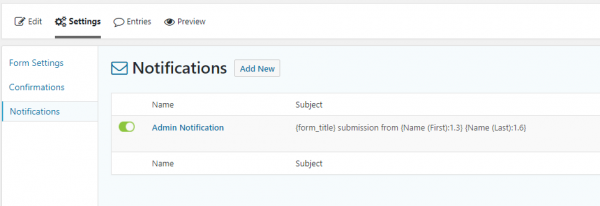
- The Send to Email is the Admins/Maintainers email

- The From Email must be DoNotReply@nau.edu

- The Subject Line must be: {form_title} submission from {First name} {last name}

- Always include form contents within the Body of the email using {all_fields}
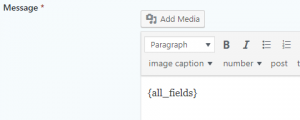
Before moving to another section within the Form, click Update Notification. You will lose your work!
Add a form to a page Accordion Closed
Forms must be created before they’ll appear in the list.
- Open the page where the form will appear and click Add Form.

- Select the existing form from the dropdown list.
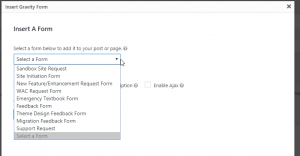
- Click Insert Form.
- Uncheck the Display form title checkbox
- Uncheck the Display form description checkbox
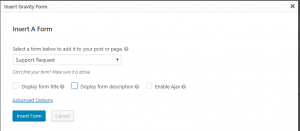
- In the shortcode that appears in the content editor, change the title and description to false.
- ([“gravityform id=”#” title=”false” description=”false””])
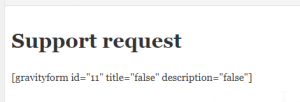
- ([“gravityform id=”#” title=”false” description=”false””])
Enter the form’s title as Heading 1 if the form is the only thing on the page. Otherwise, use the appropriate heading based on what is already on the page.
Field index Accordion Closed
Checkboxes – Present a number of options to the user where they can select multiple options.
- The description must have “Check all that apply”.
Date – There are three variations of Date Input that the form creator can choose from. Each is accompanied by a special set of settings to control the chosen field.
Drop down – Allows the user to choose one predefined option. Can be used to specify a topic and make other fields appear using conditional logic.
Email – Allows the user to input their email. Can be set for the user to type their email in twice in order to confirm, which is useful for security situations.
Name – Allows the user to submit their name in a form, easy way of getting the information without making several “single line text” fields.
- When you create a name field, by default it creates a field with two inputs for the user: First and Last. However, you can change which fields are included within in the General tab of the field. These fields can include Prefix, First, Middle, Last, and Suffix, which will show up in that order when putting them into a form.
Paragraph text – “Paragraph Text” is similar to “Single Line Text” but allows the user to enter more than one line as the name implies. This can be used when a user is asked to describe an experience or explain something.
Phone – Allows the user to input their phone number. Can be set to allow phone numbers in either the (___)___-____ or international formatting.
Radio buttons – Similar to “Drop down” but presents the options in a list to the user. Must be used to select a single item.
Single line text – This field is used when the user needs to enter a single line of text.
Time – Time allows the user to input a time value into a field. It can be set in a 12 or 24 Hour format. There are various Custom Sub-Labels to give users an idea of what input style is expected.
Troubleshooting Accordion Closed
Explore the fields that are available in the panels on the right-hand side. Common fields may appear in the Advanced Fields panel.
Before moving to another section within the Form, click Update. You will lose your work!
you can also look at Gravity Forms Vendor Documentation for more in depth help and research.
Email submissions
Recipients of form submissions receive emails, but these may end up in your Junk or Spam folder. All form submissions are saved to a database, so they are accessible if your emails got lost in your Junk mail.
There are multiple ways to adjust your Junk mail settings, depending on your system.
Advanced forms
If you need support building a complex form, please contact EASI Web Team.
Example
This is an example of a default contact form. The name and email are from the Advanced Fields menu. The subject is a single line text field and the details section is a paragraph test field.