Contact Advanced Research Computing
Quick Links
Globus
Globus’s straightforward web-based interface makes it simple to share data between Monsoon and other educational/research institutions, without the need for a command line or extensive technical knowledge.
- No matter how large the dataset, Globus transfers are fault-tolerant and move directly between endpoints, with optional encryption.
- It’s also great for more everyday needs: transfer data between Monsoon, NAU OneDrive, NAU Google Drive, and Windows/Mac/Linux workstations!
Making a simple transfer
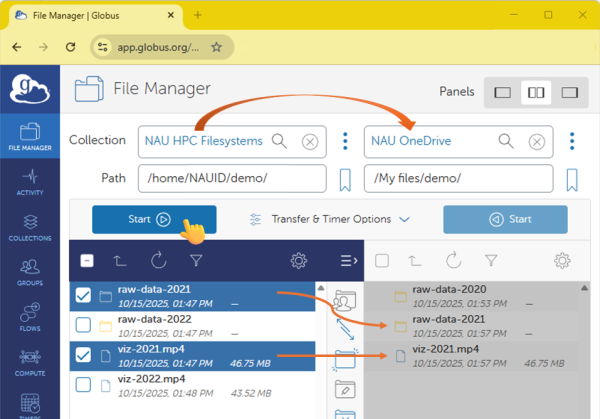
- Choose your source & target “collections”
- search “nau” and choose NAU HPC Filesystems, OneDrive, or Google Drive
- or search for your workstation’s Globus Connect Personal collection
- or search for a collaborator’s email/Guest Collection
- Navigate to your desired source & target directories
- you can manually enter a path in the box beneath a collection title
- or you can navigate using each collection’s file-browser
- Select the files/folders you wish to transfer and click “Start”
- you can immediately close your browser window!
- the endpoints will continue to manage your transfer
- Check the status of your transfer any time
- login to globus from any browser and click “Activity”
More information:
- Globus offers excellent, detailed instructions on how to transfer files:
https://docs.globus.org/guides/tutorials/manage-files/transfer-files/
Use Cases
While Globus is made for transferring large data sets quickly and optionally securely, its not a fit for all data transfer use cases.
When to Use Globus
- You want to avoid the command line (cli tools are available, but not covered here).
- You have large or many files to transfer.
- You want to transfer data in the background.
- You need high data transfer speeds.
- You need to make sure data loss does not occur.
- You need to transfer data over an unstable connection.
- You want to share your data with your colleges.
Using Globus
Logging Into Globus Accordion Closed
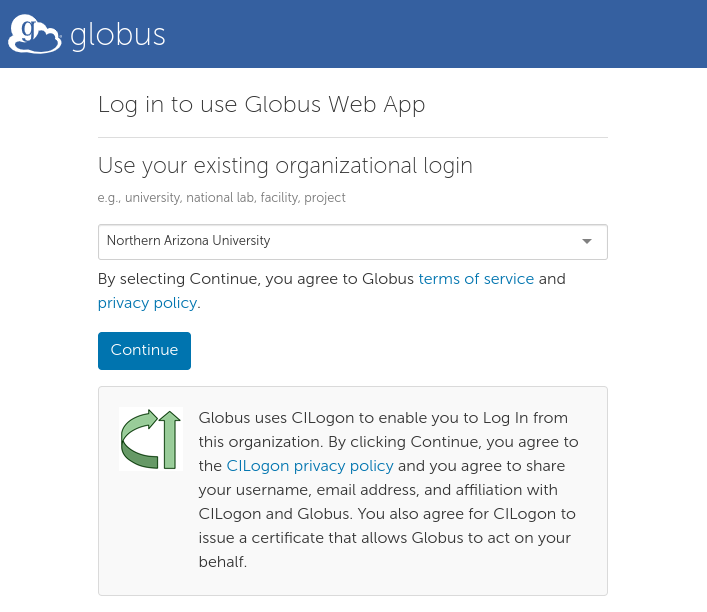
Since Globus is third-party software, you will need to search for the correct organization to log in with your NAU account. To do this, you must:
- Navigate to the Globus login site.
- In the “Look-up your organization” box, type and select Northern Arizona University.
- Read the Terms of Service along with the Privacy Policy.
- Press the Continue button to log in via NAU.
Globus consent prompts Accordion Closed
Globus requires explicit consent for many actions, the first time you do them. These consents are similar to the permissions-requirements presented when installing a smartphone app, and may be revoked at any time. You may read more about them in the official documentation: https://docs.globus.org/guides/overviews/clients-scopes-and-consents/

Accessing Monsoon’s Filesystems Accordion Closed
To access files in Monsoon’s /home, /scratch, /projects, or /common filesystems, you will need our NAU HPC Filesystems collection:
- Make sure you are logged into Globus with your NAU account.
- Navigate to the File Manager (if you aren’t there already).
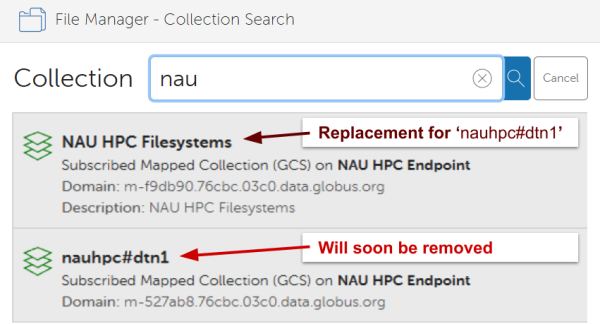
- Near the top of the page, click on the search bar next to the Collection label.
- In the search bar, type NAU HPC.
- Click on the result that contains NAU HPC Filesystems
By default, this will place you in your home directory in Monsoon located at /home/<NAUID>/. You can navigate to your /scratch/<NAUID>/ or /projects/<PROJECT>/ directory by entering it in the Path box, or by clicking the up one folder button a couple times.
Then choose the “other side” of your transfer– you have many options! (Note you may need to select the 2-panel view using the icons in the top-right of the Globus file-manager.)
- You can use the NAU OneDrive or NAU Google Drive collections
- You can choose another, different area within NAU HPC Filesystems
- You can search for a collaborator’s guest-collection by its name, or by their email address
- You can install Globus Connect Personal on your workstation to create a personal collection there
Then simply select the files you want to copy on one side, and click the “Start” button!
More information:
- Details on Globus collections available at NAU
- You may install the small Globus app on your workstation to transfer files to/from any of NAU’s collections! Globus offers excellent, detailed instructions here:
https://docs.globus.org/globus-connect-personal/
Sharing Monsoon Files with Collaborators Accordion Closed
One of the greatest benefits of using Globus is that it is already used by many other universities and research institutions. Most institutions that utilize Globus allow their users to create Guest Collections that can be read from (and optionally written to!) by collaborators from other institutions. Instructions are linked below.
Creating a guest collection can be a more advanced topic, but the ARC staff are happy to answer any questions and assist in creating a sharing setup: just email us at ask-arc@nau.edu!
More information:
- Details on Globus collections available at NAU
- Globus offers excellent, detailed instructions on sharing files with/from collaborators:
https://docs.globus.org/guides/tutorials/manage-files/share-files/
Note: images for steps 3/4 are swapped! - Globus also has a tutorial video:
https://www.youtube.com/watch?v=bpnVcAN99WY
Additional Support
If you are still having trouble using Globus, please consider attending one of our Globus workshops to develop hands-on experience. If our workshop schedule doesn’t suit your needs, you can also contact us to get personalized support.